Karma Glasses


DSCF2159

Karma Glasses

For those of you who like Karma stories this ones for you. Last year I photographed a wedding where all the groomsmen wanted to wear sunglasses for some of their group portraits and during the ceremony. However there was one problem, one of the groomsmen forgot his sunglasses. So naturally being the nice guy that I am, I gave my sunglasses to the glasses-less groomsman. As the weeding day progressed, I got in my zone, and it wasn’t until I was on my way home, 300 miles away from the location that I realized I didn’t get my glasses back.

These glasses were nowhere near expensive…. In fact I think I bought them at the dollar store. I have a seriously bad habit of breaking sunglasses, so until I can learn to treat sunglasses better, I go with the cheap. But regardless of the price, they looked good on me, did their job, and were even considered to be “in”.

Fast forward 5 months. After having a grand old day navigating my campus on crutches, I was waiting for my ride (hopefully I will be back in the FR-S soon) when this girl sitting next to me handed me some sunglasses in a unwrapped bag (see photo above) and said “here I just won these and I don’t need them”. They looked exactly like the pair I gave away. I said “Thanks, that made my day!” and put them on. My glorious mind took a little bit of time and then I remembered about the wedding and told her (Dia) the story. We both concluded it was Karma.

While Karma’s general accepted Buddhism and Hinduism’s definition is:  Your actions in this life will influence your fate in the next. While many people believe its mysticism is to repay someone through material items, it is important to remember that it takes the self or the human to transport and breed Karma. Thanks to people like Dia, Karma can continue to  thrive.

Photographer Down and Still Capturing Photos


A week ago I had a surgery that has rendered me immobile for the next 5 weeks or more. The day of the surgery was an event in itself. For starters the nurse hit an artery in my arm when attempting to administer an IV, luckily I have no issue with the site of blood, because there was a lot of it. After the surgery when I was being driven home, I felt like I was going to pass out. I lost my hearing and the only thing I could think about was breathing.

The pain was so bad at home, even the almighty Vicodin did nothing for me. My 14 year old dog almost passed away on Saturday after having a severe seizure. I was expecting the worst. On Sunday morning, miraculously she was back to her normal self. Well days later, Im finally starting to feel better. Now that the pain has subsided, the inevitable wave of boredom is washing over me. I currently have explored every inch of the recliner that I’m confined to. I have a stack of books to read and have been playing hours upon hours of Battlefield.  Something was still missing, photography.

I started watching some photography reviews and tutorials via my chromecast (a $35 TV streaming device I highly recommend even though there is little support for Mac and iPhone) but that only increased my desire to get out and shoot, which when you are confined to limited walking even on crutches is next to impossible. So the past couple of days I have been shooting with my x100s from the recliner.

My challenge has become taking photos from one location, in a room where nothing really changes except for the lighting, the occasion bird at the window, and every so often when the dogs stop and say hi. To add to the difficulty, the x100s has a fixed lens (if you have read my x20 post and are wondering why Im not shooting with that, there will be a dedicated post for that later). I could go get one of my Canon’s and have all my lenses with me but I really don’t have room for all that equipment. Who knows? I will probably resort to that as the weeks progress.

This challenge has helped diminish my boredom and has also reminded me of how important taking multiple shots with different angles of your subject is. ( See the last set of photos )

DSCF1999

DSCF2003

All ready for maximum entertainment

All ready for maximum entertainment

DSCF2022 DSCF2019 DSCF2017 DSCF2023 DSCF2027

The importance of taking multiple shots is demonstrated below:

Good however her front paw is cut off

Good however her front paw is cut off

Better but there is a distracting white blur in the right hand corner

Better but there is a distracting white blur in the right hand corner

Almost there, Im just not liking the angle

Almost there, Im just not liking the angle

There it is.... Also the exposure was increased

There it is…. Also the exposure was increased

Product Review: Expert Shield, Protect Yourself


front

I was excited when Expert Shield asked me to review their screen protector for the Fujifilm x20. I currently was living life with my x20 unprotected and there were few times where I thought that I had scratched my screen but thanks to Expert Shield I wont have to worry about that again.

Design:  I was pleased with the small packaging. Lots of other screen protectors and products come in oversized cardboard boxes with metal attachments and loads of tape. I can’t help but laugh every time I purchase an item were I feel like Im paying half of the price for the container. Im not an environmentalist by any means but whether conscious or not I give bonus points to Expert Shield for their minimalist design.

Contents: Only the basics and that’s fine. While cleaning fluid is nice, water is everywhere. Included is a nice cleaning cloth and the screen protector. Directions are conveniently located on the back of the packing, so don’t throw it away until you’ve applied it.

contents

Application: Expert shields application process is very similar to other screen protectors. Its a two step process that most will find familiar.  I would rate my screen applying skills slightly below average. I had to realign mine once which resulted in a slight permanent air bubble in the corner. I also had some “normal” air bubbles and was able to get rid of them by using the included packaging to smooth them out. What I like best about this screen protector is that it does not affect the image quality. In fact its very hard to tell that there is a screen protector on.

photo-3

Functionality: The first time I misaligned the screen protector, removing it was some what difficult. This difficultly is actually a very good sign that the screen protector will stay on for a long time. Expert Shield protector will function just as any other protector. Protection from smudges, scratches and the unknown come standard. There are competitor’s such as Zagg, that offer military grade protection but lets be honest Im not sure what the point of having a military grade screen protector is? If you need that kind of protection for your screen the rest of the camera or device isnt going survive.

Conclusion: Expert Shield screen protectors offer a piece of mind without altering the clarity of your screen. For me, I don’t have to worry about my metal zippers on my duffel bag scratching the screen every time I take my camera out and at $11.95 its an inexpensive way to protect your screen.  If you would like to purchase a screen for your camera, tablet, or phone visit: Expert Shield

The Fujifilm X20 Experience


After months and months of deliberating over whether I should buy the Fujifilm xe1, x100, x100s or the x20 I have finally made my mind up and bought the x20! Now some of you may be saying what???…. your crazy why on earth didn’t you buy the new cool kid on the block the x100s ?  Now don’t get me wrong I was clicks away from pre ordering the x100s but one day I said wait a sec what is the real reason Im buying this camera? I already have a 5d mark ii. The x20 is half the price  of a x100s and the x20 will meet my needs.

Im calling this blog entry an experience rather than a review because there are pletny and plenty of review out there on this camera. Personally I get tired of really the same thing over and over again. If your looking for a quality review with specs of the x20 look here X20 Review. My entry will more be about the features I like and dislike on the camera and the quality of the shots.

As soon as I took the camera out of the lovely Fujifilm black box, I was in love. The feel of the camera and the looks are downright awesome. You can tell that Fujifilm puts a lot of thought into their product all the way down to including a tool to apply the strap on the camera. I immediately put the battery on the charger because I knew the charging process was going to take awhile. Fast forward two hours and it was charged, not so bad but still I was expecting it to charge a little faster than my 5d mark 2 battery.

Colors The colors that the Fujifilm system produces with the x20 are great… I can’t quite pinpoint the feel but I like it a lot. The camera has a personality to it.

Optical  View Finder: One major assumption I made was how the optical view finder (OVF) would function. I was thinking that it would operate like a dslr, when you take a picture there will be a confirmation via the shutter going down and up again. With the X20’s OVF this is not the case, if you have the camera on silent mode you wont even know you took a picture unless you pay close attention to the green box projected in the OVF. There are a couple other problems with the viewfinder,  your hand gets in way of the view finder when zooming and when composing where the subject has to be in the center, its not always lined up correctly because the OVF is not on the same plane as the sensor.

Heres some shots Straight Out of the Camera (SOOC) in jpg format

Menu and Features: I found the menu a little difficult to get used to… but thats expected when coming form a different camera system. There are a good amount of features with this camera which I like to see. So many features makes me feel like Im in more control over my photos. One feature in particular I like to use is the miniature effect and pro focus mode.  There are many fun modes to explore however they only export in jpg. and they have some issues with them. The miniature effect mode oversaturates the photos. The toy camera mode has too much of a yellow tint to it. It would be nice to see the ability to have more control with the advance features and have them export in raw.

 Miniature Effect

The Pro focus mode in the adv features has huge potential. The way it works, is you focus on your subject and press the shutter button. The camera takes 2 to 3 shots and instantly stitches them together resulting in a creamy bokeh background which is seen in dslr shooing in large apertures. Below is a photo taken with pro focus. I found in this mode best results are when you have a background with a lot of depth to it . I cant wait to test it out with some models.

Focus: The autofocus was very snappy and accurate. Dare I compare it to my 7D…. The only two focus modes I have tried are af-s and manual mode. The times I found myself  switching to manual mode was in some low light conditions. In manual mode you can use focus peaking which basically outlines whatever is in focus with a white line. To be honest I ended up turning it off and just using the magnification mode. All in all the x20’s auto focusing system is superb.

Digital Zoom One feature I feel that has been overlooked by other reviewers is the digital zoom. Which normally I tell everyone to stay away from however Fujifilm has done some magic and the x20 produces usable photos with the digital zoom on. The zoom is one of the main reasons why I bought this camera, where I live there are some things that you just cant get close to without getting wet. Here are a couple of examples:

Street Shoot A couple of days later I took the camera out for its first street test in La Jolla. I was finally starting to feel comfortable with changing settings on the camera. As I was walking around town, I noticed lots a people checking out my camera which I had hanging around my neck.  I was thinking about getting a half case for it but I dont really think its necessary. Anyways the x20 was literally turning heads. That’s how good it looks.

Shots from around La Jolla:

Low Light The x20 does a good job in low light,  especially when you have the image stabilizer on. I would say usable up to 1600. I haven’t had time to really test the ISO range on the x20. When I was in La Jolla, I didnt go above 1600 and that was primarily because I didn’t have to. Moral of the story, ISO should be the last setting you adjust to compensate light, unless  the motion of the subject is the priority. Below is a shot I took in my living room at ISO 800.

High five to anyone who can guess what I was watching.

The Exposure Compensation dial: What a great feature added to the x20. Basically this dial allows you to adjust the exposure quickly without manually changing the shutter or aperture. Its great when you have situations in which there is harsh light. I also found that whenever photographing something yellow I usually stop the camera down a to -1.00.

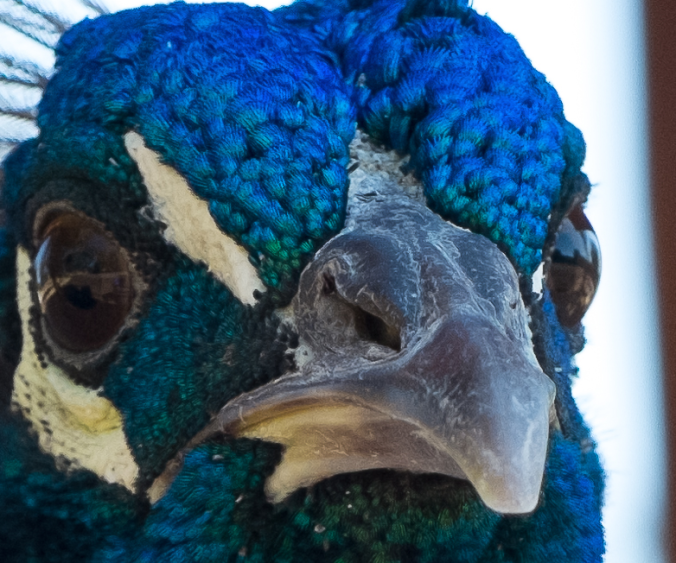
Smearing: There have been many complaints about smearing or a watercolored effect on the x20’s jpg photos. This is very  noticeable at 100 % crops. It seems as though even with the noise reduction at negative 2 there is still too much reduction. I suspect a firmware update will solve this issue. For the time being the raw files are much much better. The smearing effect is absent and the photos are much sharper when taken in raw.

Taken in raw and converted in Lightroom 4 100% crop. Focus point it the birds nose.

100 percent crop x20

PRINTING: I figured since this is my walk around camera, the largest I will most likely want to print is 8 X 10. I decided it would be a good idea to print out a couple of 8 x 10’s to see the quality of the camera. I was very satisfied with prints. I even printed two photos that had the digital zoom on. Besides a little smearing in some areas the prints were acceptable.

If you are a pixel peeper I invite you to my website to look at the photos in 100%, Yes there are flaws but I think for web and small print this camera is plenty fine!

Battery:  Due to the low life of the batteries, I highly highly recommend purchasing at least 3 batteries for this camera. They take about 2 to 3 hours to charge, so always have some ready to go. I shoot with camera on high performance mode, which increases AF speed and keeps the screen bright. So yes you can prolong the life of the battery in the other mode but why would you want to limit the performance of your camera. The batteries are also small and light enough so that they are not a nuisance in your pocket. To purchase the OEM battery from Fujfilm Click on the top image. Or you can do what Im doing and purchase two aftermarket batteries with a car charger for roughly the same price.

Fujfilm OEM

Wasabi Power

Conclusion: Yes I realised this entry ended up being a review of the camera, there was just so much I wanted to talk about. This is a GREAT camera. No it will not fit in your pocket but its light enough to not be a problem. I take this camera everywhere I go. Its very good in all conditions. Combining all the features and the capability of this camera I would say that this camera it great for both amateurs and professionals alike. As soon as Fujifilm (which has a great track record of listening to their customers and solving issues) fixes the jpg smearing, this camera will be much more enjoyable by all. Right now I would stick to editing in raw. Would I choose this over the x100s… Yes! the quality is far better on the x100s but the reach the x20 has along with price make up for the quality. I have already caught myself saying wow Im so glad I have the extra reach to capture that shot. The X20 continues to surprise me and is very very versatile. You also have to remember that my decision is based off of my needs which were to replace my iphone 5 camera. So if you are looking for a camera thats smaller and lighter than a dslr, maintains the same features as a dslr and has style, the x20 is for you!

If you were thinking about buying this camera hopefully I have convinced you. Click on the X20 below to buy it from Amazon!

Silver

Black

On The Road and a new Photography Theme


Most of us have been there before, riding as a passenger on a long road trip gazing off into the distance, watching passing landscape rush by your eyes. For photographers its torture, theres a shot, theres a shot…. “Oh man can we pull over for just a second to get this shot, I don’t care if its dangerous.”

On a recent road trip, I couldn’t take it any longer. I decided to take pictures while sitting as a passenger in the back seat. I immediately became in love with this new form of shooting. Every second there was an entirely different scene. On top of the constant change in scenery I felt like I was shooting sports because timing was critical in every shot, too late or early and I got a tree or a car in my shot. I was mindful of other cars in that I didn’t distract them. For me life on the road just became much much more enjoyable.

If you want to shoot on the road please follow all or some of the following rules and I am not responsible for any of your actions:

  • Never shoot when you are driving 
  • Never distract drivers
  • Always wear your seat belt
  • Dont take so many pictures that you end up annoying the driver
  • Follow local and state laws

With those rules out of the way. I found that my 5D paired best with my 135mm. 135mm on a full frame seemed like just the right amount zoom. My shutter speed varied, initially you would a very fast shutter speed so you can receive the sharpest image possible. However during some of the trip we were driving after the sun went down so I had to drop my shutter speed all the way down to 1/25th of a second. Its all about experimenting.

So here is my first batch of photos, I have created a gallery dedicated to my photos taken on the road and will be updating in periodically

Gallery: ON THE ROAD

First Batch:

Oceanside Pier after the Storm


Finally got some time off to shoot. Strolled around the Oceanside pier right after a storm. It was cold by our standards but warm for the rest of the nation. I had a great time shooting whatever without a real goal in mind. The shots below were taken with the 5d mark ii and a combination of the 35l, 70-200L, 17-40L and my lovely $3 135mm.


The Three Realms


The Three Realms is a  composite that I made from 8 photos. It is a depiction of Heaven and Hell with the Earth in the middle hence the title: The Three Realms. Originally, I was exploring the option of making a scene of Heaven with images from the clouds and the buildings. However, I was struck by inspiration and continued to add more and more to the composite until I was satisfied.  I really enjoyed working on this for a couple hours and then stepping away from the computer to contemplate my next move with the composite.

What makes this composite so special is that the images were taken with three different cameras (Canon Rebel XT, Canon 7D, and The Canon 5D Mark II) over the span of five years. Starting with the Heavenly Stars- taken from my backyard, The Heavenly buildings- The San Giorgio Monastery in Venice, Italia, Heavenly clouds, Earthly mountains – from a local mountain peak, and Hell- from local 2008 and 2009 wildfires.

My interpretation of the image moving from bottom to the top of the image:

Hell- the small specs of light represent the unknown…. they could be demons or eyes of monsters.  The fire and smoke represent heat and suffering. Fire is beginning to ignite the bottom part of the earth indicatiing where the world might be headed.

Earth- Life represent by lush greens. The large separated houses represent the desire for individuality and freedom.

Heaven- The dense clouds are my idea of the unknown location and difficult path to get to Heaven. Once above the clouds, everything is clean, simple, and clear. The buildings could represent the house of God or maybe a personal castle away from the evils of the Earth and Hell. The stars represent the vast size of what Heaven could be.

My interpretation and inspiration to apply meaning behind everything in the Three Realms comes from Dr. Fred Levine and his Art History lectures.

You just joined your first forum! Heres how you insert a picture in a post?


So you just joined your first forum and are about to post your first thread. After you proof read it ( so you don’t sound like a drunk fool) you say ” Hey it would be awesome if I could show everyone my dog! ” But how the heck do I do that? Heres how.

***First and foremost you need to have your images hosted somewhere. The two sites I recommend are Flickr or Smugmug ***

There are many many different forums and image hosting sites so Im going to give examples of both Smugmug and Flickr. If you have any questions ask me in the comment box and I will be glad to help.

It is also very important to follow your forum image posting rules. It may be very tempting to post all 800 photos of your dog, but really we only want to see 8 or 9 max.

The main goal is to find the address or location of your photo on your hosting site, copy that address, and then paste it in specific forum location.

SMUGMUG Directions
Step 1:  Locate your photo and click on the share button.

Step 2:  Then click on get a link.

Step 3: Next choose the size of the photo. This is important because you don’t want to post a photo thats too big or too small. For me I find that large works.

Step 4: Go to the forum that will have the pleasure of viewing your wonderful photo and create a new post or open up the reply box. When you are ready to post your photo click on the yellow box with the mountain icon. *** Note this might be different from your forum, look for an icon that looks like a photo***

Step 5: You will get a pop up window, right click in the white box,  click on paste, and  then click OK.

Step 6: Wheres my photo? It’s there don’t worry this is code for the forum.

Step 7: This is the most important step. Click on preview post next to submit reply so you can check if your photo will be displayed properly.

Step 8: When your satisfied, submit it to the world!

Flickr Directions:

Step 1:  Click on the photo you want to insert, then right click anywhere on the image and click the size you want to insert into your post.

Step 2:  You will now see your photo again but at the size you defined. Right click and select copy image address *** Note Im on a mac, so it might be different on a pc***

Step 3: Go to the forum that will have the pleasure of viewing your wonderful photo and create a new post or open up the reply box. When you are ready to post your photo click on the yellow box with the mountain icon. *** Note this might be different from your forum, look for an icon that looks like a photo***

Step 4: You will get a pop up window, right click in the white box,  click on paste, and  then click OK.

Step 5:Wheres my photo? It’s there don’t worry this is code for the forum.

Step 6: This is the most important step. Click on preview post next to submit reply so you can check if your photo will be displayed properly.

Step 8: When your satisfied , submit it to the world!

Urban Adventure: Encinitas


A couple Saturdays ago I woke up, turned on my ipad and checked some of the blogs I follow to see what people were up too. I got inspired by Claire Atkinson’s Blog on Urban Photography  I decided I was going to go out on my first urban photographic adventure.

For some reason I feel weird when taking photos of strangers. When ever I take a photo of a stranger they are usually performing an activity that warrants a photo, for example a juggler at a festival. So as soon as I got out of my car and had my camera ready, I was going to take a photo of the first person I saw. Luckily for me that person was on a bike and riding fairly quickly. Next I was approached by a homeless man. He asked for a dollar, I gave him one then asked if I could take his picture but he said ” no way man…. Im too famous” hahaha.  After I got my toes a little wet, it was time to go swimming. I entered a shop that was filled with beautiful mexican inspired art.

As I turn to my left a man sat at a desk working on some of the art so I quickly took a photo of him and smiled. I figured if he didn’t want me to take his photo he would have said something.

After exiting the store I walked through a bazaar.

After I left the bazaar, I was on my way walking through the town. One method that I found exciting was stopping at a store entrance and taking a quick photo. The only problem with this method is the fact that I didn’t have time to properly expose the images and I was going from really bright conditions to really dark.

I spent a good hour or so walking around the town, taking pictures of whatever seemed interesting.

And for my favorite picture I took that day…….

On thing that made this shot special was the fact that he knew I was there. I was about 75 feet from him and he took notice of me as soon I stepped on to the platform. I couldn’t resist this shot. I used one of the large concrete  pillar to hide myself as I swapped out my 30mm 1.4f for a manual focus 135mm 2.8f (the longest telephoto I had with me). I waited a little bit for him to lose interest in me, then I swung around the pillar and took about ten quick shots.

Lessons Learned from this Adventure: 

  • If a homeless man/women asks you for money, ask if you can take his/her picture before you give them cash
  • Be ready to shoot quick 
  • Look all over for photo opportunities
  • If taking pictures of interiors and there’s no time to properly expose the image, make sure your shutter speed is no lower than 1/60th 
A big thanks to Claire Atkinson for the inspiration!